Creating Slick Forms Using Ajax, jQuery & CSS: No More Ugly Forms
sponsoredWhatever content you have to present, you can present them in a more interactive & more responsive ways. In this article we’d like to present 10 Impressive techniques using some jQuery magic to style slick forms with a simple, rich user experience that gets them excited about your contact, register or whatever form you have.
A. Styling Forms Fields
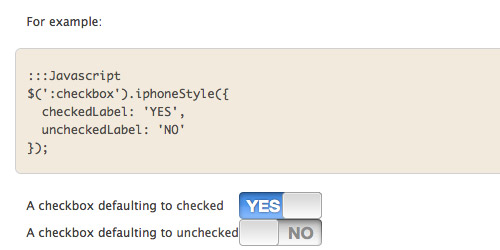
1. iPhone-style Checkboxes
iphone-style-checkboxes implements the iPhone toggles as replacements for standard HTML checkboxes. Simply run the script and your site will be updated with these specialized controls. Best of all, the underlying checkbox is not touched and backend system will never know the difference. The change is purely visual.
How to use it:
Once the files are available to your site, activating the script is very easy:
:::HTML
<head>
  <script src="jquery-1.4.js" type="text/javascript"></script>
  <script src="jquery/iphone-style-checkboxes.js" type="text/javascript"></script>
  <link rel="stylesheet" href="path_to/style.css" type="text/css" media="screen" />
  <script type="text/javascript">
    $(document).ready(function() {
      $(':checkbox').iphoneStyle();
    });
  </script>
</head>
The initialization method takes a handful of options.
- - checkedLabel sets the text of the “on” state. Defaults to: ON
- - uncheckedLabel sets the text of the “off” state. Defaults to: OFF
:::Javascript
$(':checkbox').iphoneStyle({
  checkedLabel: 'YES',
  uncheckedLabel: 'NO'
});
2. Uniform
Uniform masks your standard form controls with custom themed controls. It allows you to style checkboxes, drop down menus, radio buttons, and file upload inputs. It works in sync with your real form elements to ensure accessibility and compatibility.

How to use it:
Using Uniform can be quite easy as well. Simply call:
$(function(){ $("select").uniform(); });
To “uniform” all possible form elements, just do something like this:
$("select, input:checkbox, input:radio, input:file").uniform();
3. Niceforms
Niceforms is a script that will replace the most commonly used form elements with custom designed ones. You can either use the default theme that is provided or you can even develop your own look with minimal effort.
Starting with the basic XHTML code for a web form, Niceforms parses the DOM tree, gets all the input fields, hides them, and positions their new graphical appearance in place. All this is done while preserving the date transfer and selection features of the regular form. Everything is done via javascript.
How to use it:
Niceforms is applied to all forms that have the class “niceform”. You can have other classes in there as well but one of them has to be “niceform” in order for the script to work. One of the important aspects of the script is that it requires a correctly coded form, including properly declared labels and values. There’s not much room for error and, if anything, it will force you to code your forms correctly.
4. jQuery MultiSelect Plugin w/ ThemeRoller Support
This plugin turns an ordinary HTML select control into an elegant drop down list of checkboxes.
MultiSelect is compatible with jQuery 1.4.0+ and all themes from jQuery UI 1.7+. It is known to work in Firefox 2+, IE 6+, Chrome Beta/4, Safari 4 and Opera 10.
How to use it:
First ensure you’ve included jQuery 1.4, a jQuery UI theme of your choice, and the jquery.multiselect.css file. You don’t need the jQuery UI library itself, just the theme files. The simplest use of MultiSelect is to bind the widget to your select box:
<select id="MySelectBox" multiple="multiple" name="MySelectBox">
<option value="1">Option 1</option>
<option value="2">Option 2</option>
</select>
$(document).ready(function(){
    $("#MySelectBox").multiSelect();
});
5. Perfect signin dropdown box likes Twitter with jQuery
This tutorial will show you how to create a login drop down with Twitter style using jQuery. It’ll help you save the space on your webpage and make visitors feel comfortable by the awesome toggle login form.

How it works:
When users click on the Sign In button, it’ll call a new function. At first, the Login Form (under the
<script type="text/javascript">
        $(document).ready(function() {
            $(".signin").click(function(e) {
                e.preventDefault();
                $("fieldset#signin_menu").toggle();
                $(".signin").toggleClass("menu-open");
            });
            $("fieldset#signin_menu").mouseup(function() {
                return false
            });
            $(document).mouseup(function(e) {
                if($(e.target).parent("a.signin").length==0) {
                    $(".signin").removeClass("menu-open");
                    $("fieldset#signin_menu").hide();
                }
            });
        });
</script>
B. Making Forms Work: Validating & Submitting Form Data
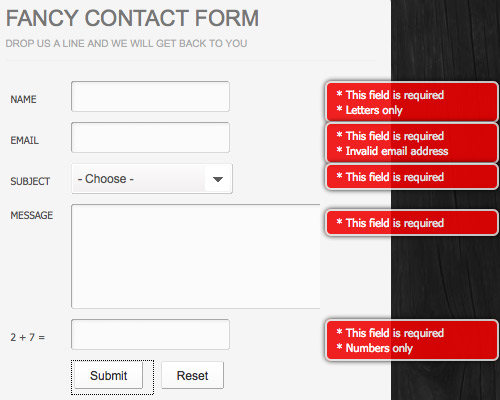
1. Fancy AJAX Contact Form
In this tutorial we are going to learn how to make an AJAX contact form which leverages modern web development techniques.
We will use PHP, CSS and jQuery with the help of the formValidator plugin for form validation and the JQTransform plugin, which will style all the input fields and buttons of the form. In addition we are using the PHPMailer class to send out the contact form emails.
2. the Ketchup Plugin
Ketchup is a slim jQuery Plugin that validates your forms. It aims to be very flexible and extendable for its appearance and functionality. Although Ketchup is designed to be styled and extended by you it already looks tasty and gives you the most common validations by default.
Ketchup provides some callbacks to completely control the markup and show/hide behaviour of the error-container, which simply can be styled via CSS.
Ketchup don’t force any markup on you. Build your own error-container, either with HTML code in a string or the element builder as shown in the example via the errorContainer parameter:
$('#example2').ketchup({
  validationAttribute: 'rel',
  errorContainer: $('<div>', {
    'class': 'ketchup-error-container-alt',
    html: '<ol></ol>'
  })
});
3. AutoSuggest jQuery Plugin
AutoSuggest is a very lightweight jQuery plugin that makes auto-completing extremely easy. It will turn any regular text input box into a rad auto-complete box. It will dynamically create all the HTML elements that it needs to function. You don’t need to add any extra HTML to work with AutoSuggest.
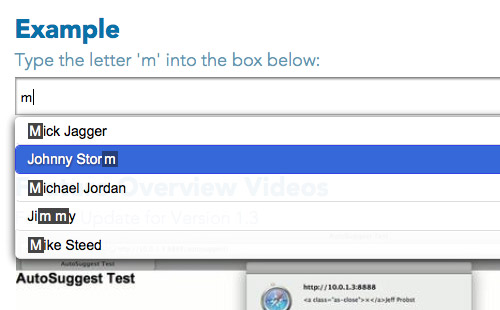
AutoSuggest uses ZERO images! All styling is done 100% in the included CSS file. This means it is super easy to customize the look of everything! You only need to edit the included CSS file.
How to Use it:
$(function(){
    $("input[type=text]").autoSuggest(data);
});
The above line of code will apply AutoSuggest to all text type input elements on the page. Each one will be using the same set of Data.
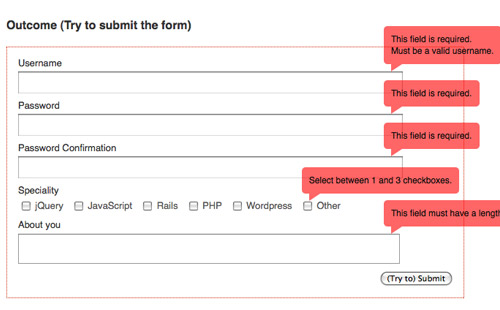
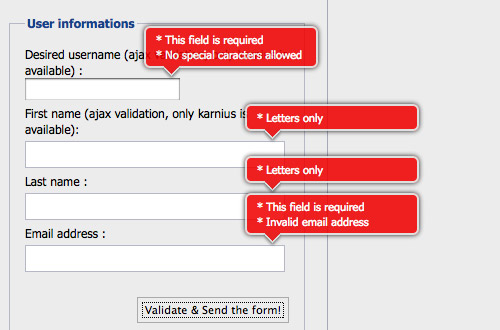
4. A jQuery inline form validation, because validation is a mess
When it comes to form validation, it’s hard to have a versatile solution that works with every form. Figuring out how to display errors is not a simple task. This is something I tried to remedy with this script. When an error needs to be displayed, the script creates a div and positions it in the top right corner of the input. This way you don’t have to worry about your HTML form structure. The rounded corner and shadow are done with CSS3 and degrade well in non compliant browsers. There is no images needed.
5. Uploadify
Uploadify is a jQuery plugin that allows the easy integration of a multiple (or single) file uploads on your website. It requires Flash and any backend development language. An array of options allow for full customization for advanced users, but basic implementation is so easy that even coding novices can do it.
![]()
Sweet, thanks!
designfloat.com May 11, 2025 @ 5:02 am
Creating Slick Forms Using Ajax, jQuery & CSS: No More Ugly Forms | DevSnippets…
In this article we’d like to present 10 impressive techniques using some jQuery magic to style slick forms with a simple, rich user experience that gets them excited about your contact, register or whatever form you have….
Creating Slick Forms Using Ajax, jQuery & CSS: No More Ugly Forms | DevSnippets « Netcrema - creme de la social news via digg + delicious + stumpleupon + reddit May 11, 2025 @ 7:10 am
[…] Creating Slick Forms Using Ajax, jQuery & CSS: No More Ugly Forms | DevSnippetsdevsnippets.com […]
ThunderZeaL May 11, 2025 @ 7:49 am
Thx, there are some great ressources !
Dean May 11, 2025 @ 8:37 am
Nice examples…..
ed May 11, 2025 @ 9:11 am
Nice post. Forms are like chairs, they’ve been around since the dawn of man. You can always restyle them and tweak functionality, but you will never replace them. Remember, King Tut and Jesus sat on chairs just like I’m sitting on a chair now, same as having to submit information through a form.
Mootled May 12, 2025 @ 3:06 am
Great post. (Don’t think king tut had to fill in too many forms, though, ed. Little job perk of being Emperor/God of your country.)
designpoke.com May 11, 2025 @ 9:33 am
Creating Slick Forms Using Ajax, jQuery & CSS: No More Ugly Forms | DevSnippets…
Whatever content you have to present, you can present them in a more interactive & more responsive ways. In this article we’d like to present 10 Impressive techniques using some jQuery magic to style slick forms with a simple, rich user experience that…
Creating Slick Forms Using Ajax, jQuery & CSS: No More Ugly Forms | DevSnippets : Popular Links : eConsultant May 11, 2025 @ 9:43 am
[…] the original post: Creating Slick Forms Using Ajax, jQuery & CSS: No More Ugly Forms | DevSnippets 11 May 2025 | Uncategorized | Trackback | del.icio.us | Stumble it! | View Count : 0 Next Post […]
Creating Slick Forms Using Ajax, jQuery & CSS: No More Ugly Forms | Design Newz May 11, 2025 @ 3:01 pm
[…] Creating Slick Forms Using Ajax, jQuery & CSS: No More Ugly Forms […]
links for 2025-05-11 « Mandarine May 11, 2025 @ 9:07 pm
[…] Creating Slick Forms Using Ajax, jQuery & CSS: No More Ugly Forms (tags: form webdesign webdev tutorial) […]
Creating Slick Forms Using Ajax, jQuery & CSS: No More Ugly Forms | pro2go Designs Blog May 11, 2025 @ 9:14 pm
[…] Visit Source. […]
Yosry May 12, 2025 @ 3:13 am
here is some great forms really ..
many thanks
Laura May 12, 2025 @ 5:22 am
Great forms.
Thank you!!
Florian May 12, 2025 @ 5:25 am
Great post, but the last Validating script (“Uploadify”) has the same picture as “A jQuery inline form validation, because validation is a mess”. Is that right?
Creating Slick Forms Using Ajax, jQuery & CSS - Robert Bojor May 12, 2025 @ 8:42 am
[…] up devsnippets.com and revel in the knowledge… Tags: ajax, CSS, forms, […]
Try extending the autocomplete functionality to populate more than just the current field, very useful for city/state lookups and more: http://af-design.com/blog/2010/05/12/using-jquery-uis-autocomplete-to-populate-a-form/
Thanks for these great forms! You could complete this list with Faary.com - free, online CSS/XHTML form builder
TonyB May 12, 2025 @ 2:05 pm
Great except the examples do not style properly in IE8.
Wrong picture for Uploadify btw
Some nice inspirations for “forming”
Moduli, di tutto di più — Studio404 Web Agency May 13, 2025 @ 5:31 am
[…] Creating Slick Forms Using Ajax, jQuery & CSS: No More Ugly Forms Salva / Condividi var a2a_config = a2a_config || {}; a2a_localize = { Share: "Condividi", Save: "Salva", Subscribe: "Abbonati", Email: "E-mail", Bookmark: "Segnalibro", ShowAll: "espandi", ShowLess: "comprimi", FindServices: "Trova servizi", FindAnyServiceToAddTo: "Trova subito un servizio da aggiungere", PoweredBy: "Fornito da", ShareViaEmail: "Condividi via email", SubscribeViaEmail: "Abbonati via email", BookmarkInYourBrowser: "Aggiungi ai segnalibri", BookmarkInstructions: "Premi Ctrl+D o Cmd+D per aggiungere questa pagina alla lista dei segnalibri", AddToYourFavorites: "Aggiungi ai favoriti", SendFromWebOrProgram: "Invia da un indirizzo email o client di posta elettronica", EmailProgram: "Client di posta elettronica" }; a2a_config.linkname="Moduli, di tutto di più"; a2a_config.linkurl="http://www.studio404.it/2010/moduli-di-tutto-di-piu.html"; a2a_config.hide_embeds=0; a2a_color_main="DDE6AB";a2a_color_border="ECECEC";a2a_color_link_text="333333";a2a_color_link_text_hover="333333"; […]
Primeira parte do estudo de caso da clínica May 14, 2025 @ 3:15 pm
[…] Creating Slick Forms Using Ajax, jQuery & CSS: No More Ugly Forms | DevSnippets […]
SQL Server 2008 question? May 14, 2025 @ 3:25 pm
[…] Creating Slick Forms Using Ajax, jQuery & CSS: No More Ugly Forms | DevSnippets […]
Is the Microsoft SQL Server 2008 R2 Express FREE? May 15, 2025 @ 5:48 pm
[…] Creating Slick Forms Using Ajax, jQuery & CSS: No More Ugly Forms | DevSnippets […]
Terceira parte do estudo de caso da clínica May 16, 2025 @ 10:21 am
[…] Creating Slick Forms Using Ajax, jQuery & CSS: No More Ugly Forms | DevSnippets […]
Weekly Design News – Resources, Tutorials and Freebies (N.37) - Speckyboy Design Magazine May 18, 2025 @ 12:55 am
[…] Creating Slick Forms Using Ajax, jQuery & CSS (Tutorial) […]
Be Yourself Seduction. May 18, 2025 @ 5:46 am
[…] Creating Slick Forms Using Ajax, jQuery & CSS: No More Ugly Forms … […]
can sql server 2005 express make my video files on the column on a table? May 18, 2025 @ 3:17 pm
[…] Creating Slick Forms Using Ajax, jQuery & CSS: No More Ugly Forms | DevSnippets […]
Workbench May 20, 2025 @ 8:01 pm
[…] Creating Slick Forms Using Ajax, jQuery & CSS: No More Ugly Forms | DevSnippets […]
sanal şirket May 21, 2025 @ 8:40 am
this is amezign tutorial… Thanks
Uso de MysqlWorkbench-Creando Diagrama Entidad Relacion May 22, 2025 @ 7:56 pm
[…] Creating Slick Forms Using Ajax, jQuery & CSS: No More Ugly Forms | DevSnippets […]
is it possible to create a master/ detail form with sql server 2008? May 23, 2025 @ 3:54 pm
[…] Creating Slick Forms Using Ajax, jQuery & CSS: No More Ugly Forms | DevSnippets […]
Hotels of the Disneyland Resort May 24, 2025 @ 9:02 am
[…] Creating Slick Forms Using Ajax, jQuery & CSS: No More Ugly Forms | DevSnippets […]
are LED light bulbs dimmable? May 24, 2025 @ 6:01 pm
[…] Creating Slick Forms Using Ajax, jQuery & CSS: No More Ugly Forms | DevSnippets […]
Solar powered torches - where to get them from? May 24, 2025 @ 6:02 pm
[…] Creating Slick Forms Using Ajax, jQuery & CSS: No More Ugly Forms | DevSnippets […]
mysql workbench.mov May 24, 2025 @ 8:01 pm
[…] Creating Slick Forms Using Ajax, jQuery & CSS: No More Ugly Forms | DevSnippets […]
SSISxpress for SSIS SQL Server 2005 or 2008, Add value to SSIS packages, by Pragmatic Works May 25, 2025 @ 5:12 am
[…] Creating Slick Forms Using Ajax, jQuery & CSS: No More Ugly Forms | DevSnippets […]
Half Price Geeks June 10, 2025 @ 8:29 pm
Wow! Thanks for taking the time to put this together! I can’t wait to tweak a few of my existing forms.
cristian tudorache June 11, 2025 @ 12:03 am
great. just great resources!
Interessante websites met Plugins « Showcase June 21, 2025 @ 7:25 am
[…] Creating Slick Forms Using Ajax, jQuery & CSS Did you enjoy this article? Share it! […]
40 Jquery Form Tutorials & Plugins | WEBGRAPHIC January 25, 2025 @ 7:58 am
[…] Creating Slick Forms Using Ajax, jQuery & CSS: No More Ugly Forms […]
jQuery form, 100 Best plugins, tools & tutorials « Zeeshan Akhter February 11, 2025 @ 1:00 am
[…] Creating Slick Forms […]
Weekly Design News – Resources, Tutorials and Freebies (N.37) March 15, 2025 @ 7:36 am
[…] - Dive Into HTML530 Creative and Unique Free FontsFilter Image View Using jQuery (Tutorial)Creating Slick Forms Using Ajax, jQuery & CSS (Tutorial)How to Create An Image Slider With Pure CSS3 (Tutorial)Creating a Bubble Coda Style with CSS3 […]
trey May 30, 2025 @ 5:48 am
The same 10 forms featured on 1000 other websites…
Such a shame